debugging better using breakpoints and the output window

Debugging, love it or hate it! Debugging is a skill that you won’t learn by reading a book but a skill that you perfect through practice (cliche, am I right?). It also makes you think outside the box in order to understand the issue better. Having said that I am guilty of finding a technique and sticking with it without being aware that there are better ways. Well recently I discovered a feature in Visual Studio that is efficient and helpful. I’m talking about breakpoint actions and tracepoints. What really blew my mind is that this feature has been around for quite a few years now (hence why I said I’ll stick with a technique) but for some reason I never really discovered it or used its full potential. Consider the following program, very straight forward but with long iterations.


class Program
{
static void Main(string[] args)
{
var status = "";
for (int i = 0; i < 1000; i++)
{
if (i < 100)
{
status = "first hundred";
}
else if (i < 200)
{
status = "second hundred";
}
else if (i < 300)
{
status = "third hundred";
}
else if (i < 1000)
{
status = "the rest";
}
}
System.Diagnostics.Debug.WriteLine("end of loop");
Console.ReadLine();
}
}

Breakpoint actions

First thing we want to debug, and are interested in, is to know what the value of the iterator i is every time the value of the variable status changed. In that case we would set up a break point like below. Instead of stopping execution I decided to output the value of i in the output window.

debuggingone

Another approach, given that we are looping for a thousand times, would be to stop, or output a value, when the iteration hits a specific point. In my case when the value of i is equal to 567, and again I decided to output the value of status in the output window using string interpolation.

debuggingtwo

Writing values in the output window

Sometimes you might not be interested in stopping the execution of the program, and in that case using the output window is a good way to analyse the values of your variables. Simply add the following snippet to any point in your source code where execution is happening and you should be able to see the results in your Visual Studio output window. Be sure to have Debug selected in the drop-down list.

System.Diagnostics.Debug.WriteLine("hard coded string or " + yourVariable);

Results

After setting all your breakpoints with specific conditions, you are now ready to run the program. The outcome should be similar to the the following.

debuggingthree

That’s me done debugging for the day, hope you found this post helpful and see you in the next post.
Bjorn

git command line in visual studio

Git has been integrated in Visual Studio’s Team Explorer for quite a few years now, and personally I think it does the job. Common features have been integrated in a nice user interface and honestly that’s what I tend to use on a daily basis.

Having said that there are still scenarios where I need to type Git commands, such as pulling from a remote branch (if this feature was integrated in Team Explorer I never found it ¯\_(ツ)_/¯ ). That’s when I start up a command line instance from within Visual Studio itself, and I do this from within the Manage Connections screen as below.

cmd1

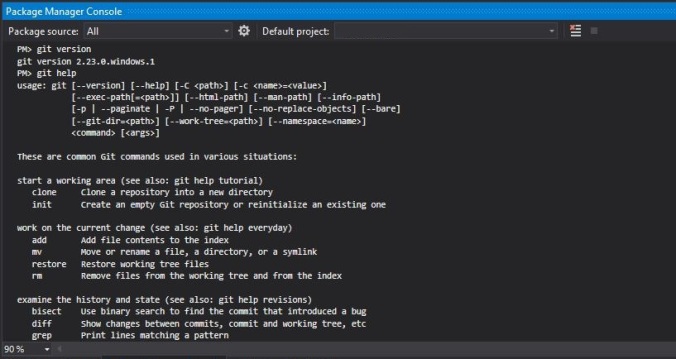
It’s great, it works and it does the job, but is it convenient? Not always. I needed a more efficient way and after a bit of research I discovered that the Package Manager Console which is inbuilt in Visual Studio, and which is also used to manage your Nuget packages, can be used as a Git command line. Fantastic, I don’t need to open a separate window each time. I just need to have the Package Manager Console window open at the bottom of Visual Studio along with the Error List and Output windows.

cmd2

If you want to take it up a notch from here what you can do is install PoshGit. Taken from GitHub “posh-git is a PowerShell module that integrates Git and PowerShell by providing Git status summary information that can be displayed in the PowerShell prompt“. In my own words, an IntelliSense for Git.

Other options include BuiltinCmd and Whack Whack Terminal, extensions which you download from the Marketplace and install in Visual Studio.

Until next blog post,
Bjorn

splitting a big pull request into smaller, review-able ones

Have you ever submitted a pull request(PR) but it got rejected straight away because it’s too big? Well I did and you’ve got to give it to the reviewers, huge PRs are a pain in the ass to review. There are various reasons why PRs should be short and concise but I will not cover that in this blog. Instead I will share with you how I managed to split a big PR (it was some 2500+ new lines of code) into smaller ones (I ended up with some 7 PRs).

Let’s say that the project we’re working on has it’s main branch master, and a new feature branch was created based on that and we’re going to name it feature/cool_new_feature_branch. We then created a new PR, called it some_huge_pr, submitted it and it is now pending and active since you’re told that you need to break it down.

In my particular scenario I was working on an new web service and it also depended on other web services, where I also created some endpoints or done some changes, and therefore for me it was easy to break it down by feature (or web services in my case). Find a sensible way how to break down your work and plan ahead how you are going to split your big PR. Find common grounds and create small groups of code implementations.

Step 1

First thing we want to do is compare the differences between master and feature/cool_new_feature_branch. In your Git terminal type this command.


git diff master feature/cool_new_feature_branch > ../huge_pr_patch_file

view raw

splitprone.txt

hosted with ❤ by GitHub

This command compares all the changes between master and feature/cool_new_feature_branch and creates a new file called huge_pr_patch_file in the root directory of your current Git connection. If you had to actually open this file you’ll find the code you wrote, in my case C#, with added Git syntax.

Step 2

Let’s switch back to master branch and create a new branch that will have just a portion of the new code. This will eventually be the new PR so we need to start thinking per feature here.


git checkout master
git checkout -b feature/first_small_feature_branch

view raw

splitprtwo.txt

hosted with ❤ by GitHub

Step 3

Whilst checked in on the new branch run the following Git command to apply all the code changes from feature/cool_new_feature_branch to our new branch feature/first_small_feature_branch.


git apply ../huge_pr_patch_file

You should now be able to see a lot of changes in your new branch. From here stage any files you want, commit and push them. For this particular step I like to use Visual Studio’s Team Explorer tools. It displays all the files in a tree structure, and you can use Visual Studio’s file comparison feature. Then again, this is just my personal preference.

Step 4

After committing the staged files, we can stash all the remaining changes (that we will not commit in this branch) including any untracked files. From here proceed to open a new pull request as you normally would.


git stash –include-untracked –keep-index

view raw

splitprfour.txt

hosted with ❤ by GitHub

Step 5

Repeat steps 3 and 4 until all the code is committed and submitted into new smaller PRs. When splitting PRs be sure to include any code dependency and/or references so that the code compiles. If, when splitting, you notice that some of your code relies on code that is in another branch then create the new branch from that one. If not create the new branch from master.


git checkout master
git checkout -b feature/second_small_feature_branch

view raw

splitprfive.txt

hosted with ❤ by GitHub

In conclusion, I’m not going to lie, I’ve only used this approach once (just last week) and I’m no Git expert. Is it possible that there are more efficient methods or even tools that do the job? Yes, I wouldn’t be surprised but this method worked for me and next time I’ll face the same issue I will try to use this method again.

I hope it’s useful for you too and if you run into any issues feel free to drop me a message to fix this post. The one thing worse than not finding a solution online, is finding a solution that doesn’t work!

Until next one,
Bjorn

reconciling your workspace in visual studio 2017 after a gated check-in

An interesting feature of Azure DevOps (formerly known as Team Foundation Server) is the so called gated check-in. What is a gated check-in? In simple terms, every time a developer commits some code a build machine will try to compile this shelveset before merging it into the current code repository. This feature is available to both Azure DevOps Service, which is Microsoft’s cloud service, and Azure DevOps Server, which is the exact same thing but on-premises.

As a developer you’d realise that the gated check-in feature is on because when you try to commit your changes you get prompted with a window similar to this.
1

We’re OK with it so we’re going to go ahead and click on Build Changes, and then after that we can notice a notification in the Team Explorer window.2

I like to click on the link where it says here. This opens a new window (see below) in Visual Studio. I tend to keep that open until the build agent is ready and the gated check-in is complete.
3.JPG

Clicking on the View Build Details link would open a new window in your internet browser and from there you can see all the processes of the build agent. A successful check-in is evident as the text and icons would turn green in both the internet browser and Visual Studio. For that same reason I like to keep the Build Request window open in Visual Studio as we get the option to reconcile workspace straight away, screenshot below. This action will basically remove all the new checked-in files from the Pending Changes section in Team Explorer.5

In case you closed the window after a successful check-in, or never really opened it, another way you can reconcile your workspace is from the Builds section in Team Explorer. Find your most recent successful build, right click and reconcile.
6

That should be it for today, till next post,
Bjorn

adding an existing file as a link in visual studio

Testing is an essential phase in the software development life cycle. I almost dare to say that no software or application(web or desktop) was ever released without testing it first. As most .NET software developers I rely on test projects to create my unit tests and test my implementations. I find it practical, efficient, it helps me identify bugs, run dummy tests, evaluate the outcomes; in other words it’s good and you should make use of it if you don’t.

One feature I don’t like in test projects is that certain configurations need to be replicated rather then referenced. Let’s assume that in my solution I have project A(which is my working project) and project B(which is my test project used to test project A). If I had to add my own settings in the configuration file (app.config vs web.config) of project A and then try to run a test from project B, the solution would throw an exception saying that the newly added settings was not found. Therefore to run my test I would need to copy the setting and add it in the configuration file of project B, something I’m not very fond of. A similar exception was thrown when I added a file(an XML file in my case) to project A and then ran a test from project B. Since the implementation depended on the XML file and the file was added in project A, the test failed. I then had to add the same file in project B in order to get the code running. Again, I’m not very fond of this practice and from not very fond it started to become quite frustrating.

I resorted to Google to find a solution. After some quick research I found out that an existing file can be added as a link to another project in the same solution. This is great, just what I wanted because any changes done to the file would be done once. To add an existing file as a link you must;

  1. Right click on the target project, click on Add and from the new menu click on Add Existing Item.
  2. A new directory window should pop on screen. Locate the existing file to add.
  3. Right next to the Add button, click on the arrow and from the drop down menu select, and click, Add As Link.

A new file should now show in the targeted project. Great! I did that happily convinced that all is going to be well in my test but, once again, when I ran my test project the same exception was thrown. It took me a while to realise but when I checked the bin folder of the test project the XML file was not there. Thus, the file was not being included in the build and it all makes sense why the test was still failing.

Again, I resorted to Google to find a solution to add the linked file to the build of the test project. I found a few solutions but none were working for me until I stumbled across Matt Perdeck’s blog post. In order to add the linked file to the project’s build you must find the project’s .csproj file(if it’s a C# project) and open it with an editing software, such as Notepad or Notepad++. At the very bottom, just before the closing node add the following text.


<Target Name="CopyLinkedContentFiles" BeforeTargets="Build">
<Copy SourceFiles="%(Content.Identity)" DestinationFiles="bin\Debug\%(Content.Link)" SkipUnchangedFiles='true' OverwriteReadOnlyFiles='true' Condition="'%(Content.Link)' != ''" />
</Target>

Quick build, located the linked file in the bin folder, ran the test and that’s it job done. From now on I had one file which is referenced in another project and whenever I ran the test it will always work. Hope this helps you guys too and hopefully it takes you less time to solve than it did to me.

See you’s
Bjorn