Recently I was working on some Cypress tests, the first time I used them if I had to be honest, and I came across an issue. I wanted to run the test files individually but when I tried the solutions I found on the internet (StackOverflow and so on), no one of them worked for me. My setup was very bare, I didn’t even have a front end project as my tests involved sending requests to an API and asserting the HTTP responses, and the JSON values in the body. Being very new to Cypress I’m not sure if the following is the right way to go but I was executing the tests using command prompt and then reading the results using MochAwesome and an HTML file it produced. When researching online I read that there’s a some sort of a UI for running tests and reading results, but that was not my approach.
Instead I went for this approach. Inside the integration folder I created subfolders for each environment I wanted test. That is the reason why I had separate, individual files. Different environments have different credentials and environment variables. In the individual subfolders I had my JS test file. So roughly, my directory was like this
Once I had that setup all I had to do was execute the following command on cmd.
npx cypress run --spec "cypress/integration/development/**"
Worth noting that if there had to be more than one JS test file inside a particular subfolder, say development, in that case all of the JS test files will be executed so yes I admit, technically speaking the title of this blog post isn’t accurate because this solution works for just one JS test file per subfolder, but hey who’s not guilty of implementing a not so clean solution?
Anyway, thanks for reading and I hope this is useful to some frustrated developer who can’t find a way to run cypress tests the way he/she wishes.
Today we shall be discussing caching. The concept of caching is rather straight-forward. The idea is to store your data on a faster secondary source, typically in memory, and not just on your primary data source, typically database. That way when your application receives requests, the data is pulled from the faster source and therefore faster response time.
In .Net Core there are two options, memory or distributed caching. Memory caching is as the name implies, in memory and it’s contained within the memory of the web server the application is running on. If your application runs on multiple web servers then distributed caching (or sticky sessions) would be a better option. Distributed caching makes your application scalable, allows session data to be shared between the web servers and does not reset when a new version is deployed. Both types of caching store values as key-value pairs. In this post I will be using Redis as my choice for distributed caching. But what if we use them both at the same time? Here’s a small POC to show how they can work together.
I created a new .Net Core solution and selected the API template. This template comes with a default WeatherForecast controller and I used that as my skeleton to implement memory and distributed caching. I figured that the temperature is a realistic value that can be cached for a few minutes since it’s not a value that changes rapidly.
I left that untouched for now and instead created a class library to act as my business layer. In there I added a new interface and this will act as my caching service. In here I implemented the following logic; check if key is in the memory cache and if found return value. If key not found then check in distributed caching and if found return value. If key not found then look up value from primary source and save value in both memory and distributed caching. In order to connect to Redis I had to download and install the Nuget package StackExchange.Redis.
This file contains hidden or bidirectional Unicode text that may be interpreted or compiled differently than what appears below. To review, open the file in an editor that reveals hidden Unicode characters.
Learn more about bidirectional Unicode characters
I decided to choose an API HTTP request as my primary source instead of a database call. Sticking with the weather theme I decided to consume the Open Weather API to get that feeling of playing around with live data. Because the second parameter in the caching service endpoint is a function, I created a new weather service whose responsibility is to consume the Open Weather API. Like I said earlier this function could be a database call. In that case we would need to inject the function that retrieves the data. For completeness sake and just in case anyone would want a code snippet how to consume the Open Weather API, here’s my implementation.
This file contains hidden or bidirectional Unicode text that may be interpreted or compiled differently than what appears below. To review, open the file in an editor that reveals hidden Unicode characters.
Learn more about bidirectional Unicode characters
I then updated the default WeatherForecast controller to use the caching service and weather service. Originally this was returning some random data and was not connected to any data source whatsoever.
This file contains hidden or bidirectional Unicode text that may be interpreted or compiled differently than what appears below. To review, open the file in an editor that reveals hidden Unicode characters.
Learn more about bidirectional Unicode characters
The services were injected in the WeatherForecast controller using dependency injection and therefore I had to update the ConfigureServices method inside the Startup class and instantiate both services. I also added a reference to the memory and distributing caching services.
This file contains hidden or bidirectional Unicode text that may be interpreted or compiled differently than what appears below. To review, open the file in an editor that reveals hidden Unicode characters.
Learn more about bidirectional Unicode characters
Last but not least I also created some unit tests to wrap everything up nice and easy.
This file contains hidden or bidirectional Unicode text that may be interpreted or compiled differently than what appears below. To review, open the file in an editor that reveals hidden Unicode characters.
Learn more about bidirectional Unicode characters
You can find the entire solution in one of my Github repositories and feel free to test it out or make your own changes. This was just a proof of concept and can certainly do with some improvements such as storing sensitive keys or connection strings in a more secure location, or supplying two different expiry times for the memory and distributed caching. Equally the caching service could easily be put inside a “common” project and then re-used as a nuget package/artifact by different solutions.
That’s a wrap for today and I hope you enjoyed this blog post. Don’t be shy to leave any comments or get in touch if anything is unclear.
Hello again, and welcome to yet another blog post. In today’s post I shall be discussing how does one go about with integration testing a cosole application. As opposed to unit testing, integration testing (as the name implies) tests different units or components together as a group. The idea is to test how they will interact together and make sure that all the modules, as a whole, pass the functional requirements.
From my previous experience I was familiar with integration testing a standard .NET Core API. For that we would normally use a WebApplicationFactory and create an instance of the API based on its configuration. In the case of a console application I adopted a slightly different technical approach, the idea is still the same; create an instance of the application. Also, the console application that I was testing was the one I built in my previous post here and here.
As usual I created a new testing project and a new class, called it ApplicationTests. In here I added a new function that will create an instance of ProcessStartInfo object. This class can be used to start processes and in my case I used it to start the console application executable file found inside the bin folder of my solution. This function will be called at the beginning of each integration test. If you remember correctly the console application relied on an appsettings.json file for it’s configuration, and one of the values inside that configuration was the directory of the setup file.
For my integration tests I will have different setup files, with different moves for the turtle to execute, to see what outcome the application will return. Therefore for each setup file I had to create a new appsettings.json file and in each I had to make a reference to the different setup files. Once I had my setup files and different appsettings.json files ready, I had to copy the test appsettings.json file to the bin folder of my solution, the same directory where the executable file lies.
This file contains hidden or bidirectional Unicode text that may be interpreted or compiled differently than what appears below. To review, open the file in an editor that reveals hidden Unicode characters.
Learn more about bidirectional Unicode characters
I added a few properties to the process that I start in my tests so that for instance no console application window would show during execution, or input and output aren’t read or written from a file. Now I just needed to write my tests. For these tests I followed the same AAA (Arrange, Act, Assert) pattern. Arranged each test to load a particular setup file, acted by running the application and asserted by reading the output of the application and compared it with the expected outcome.
This file contains hidden or bidirectional Unicode text that may be interpreted or compiled differently than what appears below. To review, open the file in an editor that reveals hidden Unicode characters.
Learn more about bidirectional Unicode characters
I used xUnit testing framework but just like unit tests, this would also work just fine with other testing frameworks such as NUnit. I also added the full solution to GitHub in case anyone would want to have a better look at it, and have a working version too.
This concludes our blog post for today. Hope this was insightful to you and if you normally implement this differently then feel free to leave your thoughts in the comment section below.
Welcome back to this two part series where we focus on development of a simple console application game. In part 1 we covered the rules, we established the basic game logic of movement and we also coded some validation. In this blog post we’ll be looking at execution of turtle moves, returning the right response to the end user and an all round polishing of the program to have a product we’re happy with.
Continuing where we left off, I created a new class and called it Minefield.cs. This will represent the instance of the game. It will keep track of different features of the game but most predomanantly it will handle the turtle’s current position and direction. Equally before we start executing the moves we want to establish some parameters such as the grid size, and starting, exit and mines’ positions.
I then created a new public method with the intention of using this as an entry point from my main class. All it does is go through the lines of moves one by one and for each character determine which private methods to call. If M then move, else if R or L then rotate.
This file contains hidden or bidirectional Unicode text that may be interpreted or compiled differently than what appears below. To review, open the file in an editor that reveals hidden Unicode characters.
Learn more about bidirectional Unicode characters
The rotation methods are quite simple to understand. I made sure to keep track of the turtle’s current position and the direction it’s facing. Depending on the current’s turtle direction, and the whether the turtle is rotating clockwise or anti-clockwise, the turtle’s direction is simply updated to the new direction which is denoted by just a string character.
Similarly, the Move method checks the current turtle’s direction and based on that it will add or substract the x or y coordinate. The logic behind the x and y coordinate is explained in part 1. Once the turtle moved one position in the minefield grid, we should then check if the new position is still within the grid, hits a mine or lands on the exit position.
The Minefield instance keeps track of item positions and turtle position, thus evaluating the turtle’s outcome after moving was easy enough. Remember, all of this is in an iterative loop and therefore happening for each character being parsed. This will ensure that if the turtle moved, say 4 positions, and hit a mine along the way it would return the right response based on it’s “journey” to get there.
This file contains hidden or bidirectional Unicode text that may be interpreted or compiled differently than what appears below. To review, open the file in an editor that reveals hidden Unicode characters.
Learn more about bidirectional Unicode characters
At this point I think it’s only fair that I explain how I decided to handle the outcome message. The requirements said that there can be three outcomes; Success, Hit or Lost. I thought that just these three outcomes exclude two other possibilities. There’s a possibility that the data in the setup file isn’t correct and validation fails. If that happens it wouldn’t be right to use any of the three original outcomes for a validation error and therefore I decided to add a new one. Equally I thought of another possibility which in my opinion wasn’t perhaps thought of, and therefore not included. This happens when the turtle walks/falls out of the minefield grid. Yes one could say that the Lost outcome could be used but then again I thought it would be better to make a distinction between stepping out of the minefield and staying inside the minefield but not hitting a mine or finding the exit.
Before we look into that I wanted to share how I handle states in the game, and this can be either validation errors, or simply the turtle’s state. I created an enum and called it Result. As you’ve already seen in my previous code snippets I used this enum to manage the flow of the game and to determine whether to continue execution of the program. Equally I added a description attribute to each enum to be able to return a more detailed message.
This file contains hidden or bidirectional Unicode text that may be interpreted or compiled differently than what appears below. To review, open the file in an editor that reveals hidden Unicode characters.
Learn more about bidirectional Unicode characters
With that in place I created another class, Response. This will handle the three different outcomes, or in my case two since I added another two.
This file contains hidden or bidirectional Unicode text that may be interpreted or compiled differently than what appears below. To review, open the file in an editor that reveals hidden Unicode characters.
Learn more about bidirectional Unicode characters
Finally all I had to do was update my Main method and make reference to the new Response class.
This file contains hidden or bidirectional Unicode text that may be interpreted or compiled differently than what appears below. To review, open the file in an editor that reveals hidden Unicode characters.
Learn more about bidirectional Unicode characters
And done! At this point you should have a functioning console application game. I also added the entire solution to a GitHub repository for better visibility.
In conclusion, I really enjoyed this coding exercise and I hope you enjoyed reading my two blog posts. Can this be done differently? Yes, 100%. I can think of many ways how this can be improved and perhaps certain priciniples like SOLID can be applied. Feel free to update and change the program how you like, and comment below your thoughts or any feedback you might have.
Thanks again for reading and stay tuned for more posts. Bjorn
Recently I came across this coding exercise which I enjoyed doing and which I’d like to share with you. Now some might say this is a game, other might say it isn’t. I interpreted it as a game and I’m happy to call it so. Here are the rules;
A turtle must walk through a minefield. Code a console application that will load the game settings from a setup file and will execute the moves that will make the turtle move. The program must output whether the moves lead to a success or failure. The program must also output instances where the turtle doesn’t reach the exit or hit a mine. Any coordinates are zero based.
Setup & Input
The first line represent the minefield as a grid defined by X and Y number of tiles.
The second line is a list coordinates of mines.
The third line is a coordinate of the exit point.
The fourth line is a coordinate of the starting point and the initial direction.
The fifth line, and any other lines that follow, are the moves that will make the turtle move and rotate.
Moves & Direction
The turtle can move one space at a time and can rotate either left or right. The only acceptable input for movement is M, L & R
The turtle can have it’s initial direction set to four different options, North, South, East & West. The only acceptable input for direction is N, S, E & W.
Results can be
Success, exit found
Hit, turtle hit a mine
Lost, turtle didn’t hit a mine but has’t found exit either
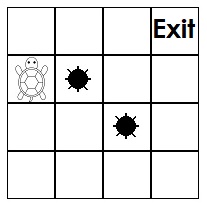
Example 4 4 1,1 2,2 3 0 0 1 N M R M M M
Before I started coding I wanted to imagine the grid in my mind and think about how the turtle can travel along the grid, and for every step check for any mines or exit. Because the rules of the game were already using a x and y coordinate system in the intial setup file to determine the position of the mines, turtle and exit, I decided to adopt the same system and represent each square in the grid with a x and y coordinate. Therefore another way of seeing the grid above is like this;
The top left corner is the starting point and it is represented by x position 0 and y position 0. At this point some of you might be wondering why I decided to place my 0,0 coordinate in the top left corner instead of the bottom left corner, which is a more mathematically natural position (so to speak). Yes I agree but I had to work with the example and the rules that I was given. Back to my reasoning, with the starting point for both x and y coordinate defined, I decided to increment the x coordinate by one as you move along the positive x axis, and increment the y coordinate by one as you move along the negative y axis. Every time the turtle moves I simply play around with the turtle’s x & y coordinate and for each step I cross check with other objects on the grid. Now that I had my game logic in place it was time to start coding.
Being a console application game the first step was to create a new .NET Core console application solution. I then decided to make my application configurable by adding a appsettings.json file in order to read the values of the setup file name and directory from there. Once I was able to read the setup file with all the commands I needed to make sure that all characters are valid before I create an instance of the game. I drafted some validation rules for each of the lines/ different components of the game.
The validation rules I came up with are the following;
The minefield size. The first line must have a value and that value must have numbers or space only. It must also have just two numbers.
The mines list of coordinates. The second line must have numbers, space and comma only. The coordinates must be validated so that they are in the minefield and not outside.
The exit coordinate. The third line must have numbers and space only. It must also have just two numbers and the coordinate must be in the minefield and not outside.
The start coordinate. The fourth line must have a value and that value must have numbers, space or the letters N, S, E & W. It must have just three non-white space characters and the coordinate must be in the minefield not outside.
The moves. The fifth and any following lines must have just the letters R, L & M, or space only.
If all of the above is validated then make sure that the start and exit coordinate do not have the same value and that the mines’ coordinates values aren’t the same as the start or exit coordinates.
This file contains hidden or bidirectional Unicode text that may be interpreted or compiled differently than what appears below. To review, open the file in an editor that reveals hidden Unicode characters.
Learn more about bidirectional Unicode characters
Each validation method is returning an object Result. This is just an enum that I created to return specific outcomes, or in this case validation errors, to the user. The first method in the class is just an orchestration method that validates each line of the file step by step. This is then followed by a set of validation methods which are quite straight forward and I explicitly check for any non-valid characters. The last two methods are slightly more logical and I use the reasoning I explained above to check if any items occupy the same tile. If they have the same coordinate then validation fails. To make sure object’s are not outside of the grid I check an object’s coordinates and make sure they are not less that 0,0 as this is the starting point and not more than the grid’s size.
I also created a utility static class and added a couple of methods to parse a string from the setup file into a tuple of two integers, which are easier to work with when you’re incrementing or decrementing.
This file contains hidden or bidirectional Unicode text that may be interpreted or compiled differently than what appears below. To review, open the file in an editor that reveals hidden Unicode characters.
Learn more about bidirectional Unicode characters
At this point my Main method was looking something like this.
This file contains hidden or bidirectional Unicode text that may be interpreted or compiled differently than what appears below. To review, open the file in an editor that reveals hidden Unicode characters.
Learn more about bidirectional Unicode characters
So far I managed to came up with my logic rules for the game, load the data from the setup file and validate it. In my next post I will be covering the movement of the turtle and determining the game’s outcome.