In this blog post I will be discussing how to have a configurable .NET Core console application that reads values from a config file. First thing I did was create new vanilla .NET Core console application and at the time of writing v5.0 was available so I decided to use that as my target framework. I then had to install some Nuget packages to my solution which are needed to have this application configurable. The Nuget packages are the following;
- Microsoft.Extensions.Configuration
- Microsoft.Extensions.Configuration.Binder
- Microsoft.Extensions.Configuration.EnvironmentVariables
- Microsoft.Extensions.Configuration.Json
I then created a new appsettings.json file and just added some data which is what I’ll be retrieving. Here’s my sample that has some logging details and allowed CORS methods, which from my experience are common values you would find in a config file.
| { | |
| "Logging": { | |
| "Url": "https://www.google.com", | |
| "Username": "TestLoggingUsername" | |
| }, | |
| "CorsAllowedMethods": "GET,POST,PUT,PATCH,DELETE,OPTIONS" | |
| } |
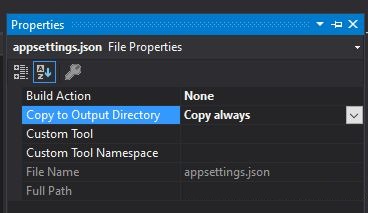
Once created we need to make sure that whenever the application builds a copy of the JSON file is created in the bin folder, the same directory where the application runs. To do that just right click on the file, click on properties and update as per the following screenshot.
I then created a couple models that reflect the structure of my appsettings.json file so that when I load my config values I parse them in my models and can be accessed easily.
| public class AppConfig | |
| { | |
| public Logging Logging { get; set; } | |
| public string CorsAllowedMethods { get; set; } | |
| } | |
| public class Logging | |
| { | |
| public string Url { get; set; } | |
| public string Username { get; set; } | |
| } |
Lastly, I added a couple methods in my main Program class. The idea is to initialise the configuration, load the JSON file, build it (and this where the Nuget packages come into play) and map them to our models.
| class Program | |
| { | |
| static void Main(string[] args) | |
| { | |
| var cfg = InitSettings<AppConfig>(); | |
| var loggingUrl = cfg.Logging.Url; | |
| var loggingUsername = cfg.Logging.Username; | |
| var corsAllowedMethods = cfg.CorsAllowedMethods; | |
| Console.WriteLine($"{loggingUrl} {loggingUsername} {corsAllowedMethods}"); | |
| Console.ReadKey(); | |
| } | |
| private static T InitSettings<T>() where T : new() | |
| { | |
| var config = InitConfig(); | |
| return config.Get<T>(); | |
| } | |
| private static IConfigurationRoot InitConfig() | |
| { | |
| // load setup file name and path from appsettings.json | |
| var builder = new ConfigurationBuilder() | |
| .AddJsonFile($"appsettings.json", true, true) | |
| .AddEnvironmentVariables(); | |
| return builder.Build(); | |
| } | |
| } |
That should be enough get you started and be able to apply a configurable approach to your solution. One thing I would like to add is that sensitive data such as passwords or database connection strings should (ideally) not be stored inside these configurable files. In my opinion, a better approach for these values is to have them stored in a more secure location such as Azure’s Key Vaults or else in Azure’s Pipeline Variables. Both are accessed using credentails and therefore only users within your organisation can access them, and the values (or any changes done to them) isn’t tracked by source control like Git.
Thanks for reading,
Bjorn
