sharing common assets in angular’s module federation

Some months ago I was tasked to develop a proof of concept Angular application but using a Module Federation approach. I have to admit that I’m not much of a front end developer myself, and I tend to code back end applications (as the blog suggests) but I like a challenge, and an opportunity to learn something new. The idea of Module Federation is to have applications built, deployed and run individually, but thanks to a “host”, so to speak, we can have an application run within another. I believe that Module Federation isn’t limited to Angular only but it can be applied to React and VueJS. If you’re coming from a back end background, think of like a standard .NET application where you’ll have the main application, or API, and then you’ll have multiples DLLs that support the solution but said DLLs can also be used in other solutions, with the only difference that in Module Federation these separate DLLs can also run on their own as independent applications.

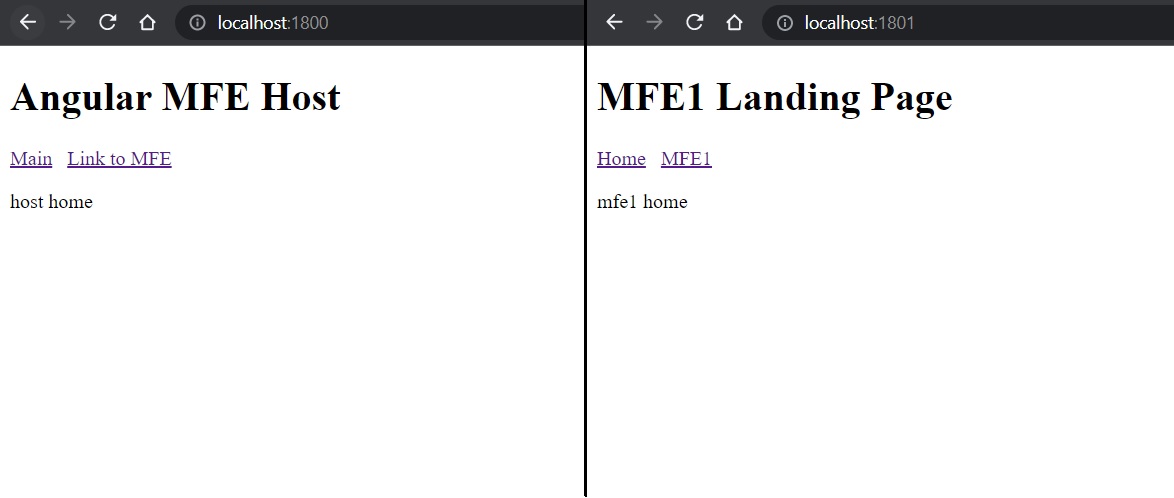
Anyway, I was new to this so naturally I resorted to a tutorial online and whilst there are numerous examples out there I decided to stick with this one. This tutorial will be the starting point for this blog post. After completing the tutorial, you should have an Angular application with host and mfe1, as micro front ends, and when you run the application using your ng serve commands you should have something like the following.

modulefederation1

In Module Federation applications should be de-coupled and should not share dependencies between them, especially npm packages, but I found that certain assets, such as images or CSS files, can and wouldn’t hurt to have them shared between different micro front ends. My interpretation of this new framework might be complety wrong and if that’s the case then my bad.

Images

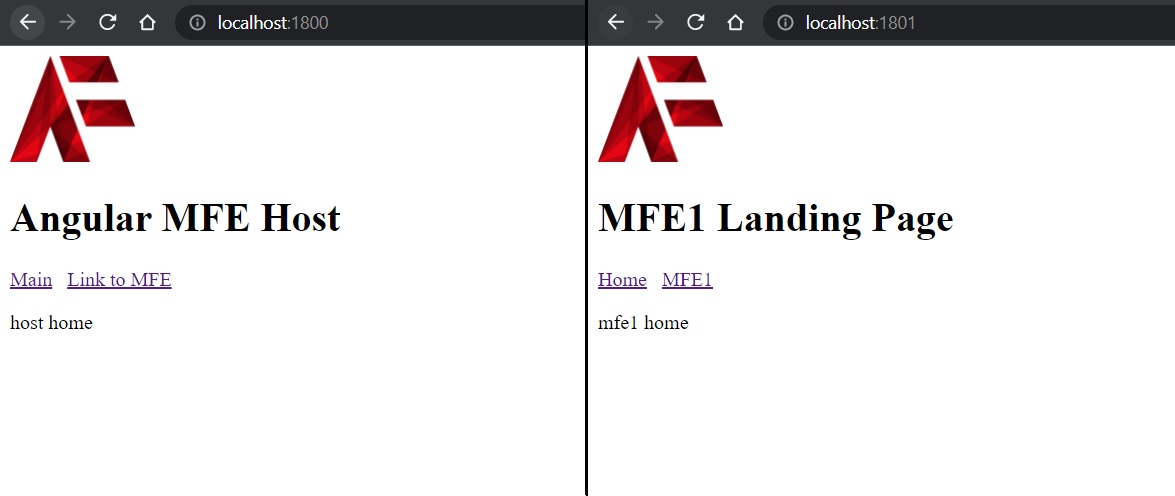
The first asset I wanted to have in common between projects was an image. To achieve this, I created a new common folder inside the projects folder that lies within the root. Inside the common folder I added a new assets folder and inside that one an images folder. I then headed to cleanpng.com and got myself a random logo.

First code change is happening in angular.json. In here, for each project (in our case two; host and mfe1), you should have build, running, serve configurations, among other things. We need to make an update to the assets JSON node in each project. The default should reference the favicon and the assets folder found inside the src folder of each project. We need to add a reference to the assets folder (inside common project) we just created, and give it an alias to be used in our HTML files. This needs to be done for both host and mfe1.

"tsConfig": "projects/host/tsconfig.app.json",
"assets": [
"projects/host/src/favicon.ico",
"projects/host/src/assets",
{
"glob": "**/*",
"input": "projects/common/assets/",
"output": "./assets/"
}
],
"styles": [
"projects/host/src/styles.css"
],

I then updated each of the project’s app.component.html, which is like each project’s entry point. I added an image HTML tag and referenced the directory we just declared in the angular.json file. 

<img alt="Logo" width="100px" height="85px" src="../assets/images/logo.png" />
<h1>Angular MFE Host</h1>
<a routerLink='/'>Main</a> &#160;
<a routerLink='/mfe1'>Link to MFE</a>
<router-outlet></router-outlet>

That should produce the following results.

modulefederation2

CSS

The second asset I wanted to have shared between the project was CSS. From the research I did some weeks ago I found that there are various ways to achieve this, definitely easier than the images, but the following was what I found suited best for me. I added my CSS styling in styles.css in the host‘s src folder. I then went back to the angular.json file and for each non-host project (in our case just mfe1) I added, just under where we just did our updates, a reference to the style.css file found in the host project.

"tsConfig": "projects/mfe1/tsconfig.app.json",
"assets": [
"projects/mfe1/src/favicon.ico",
"projects/mfe1/src/assets",
{
"glob": "**/*",
"input": "projects/common/assets/",
"output": "./assets/"
}
],
"styles": [
"projects/mfe1/src/styles.css",
"projects/host/src/styles.css"
],

As you can see there’s also a reference to the assets change we did earlier. I then updated further the app.component.html files of each project, and added new HTML tags that reference the new CSS classes. Some basic styling, nothing out of this world. That left me with the following looking micro front ends.

modulefederation3

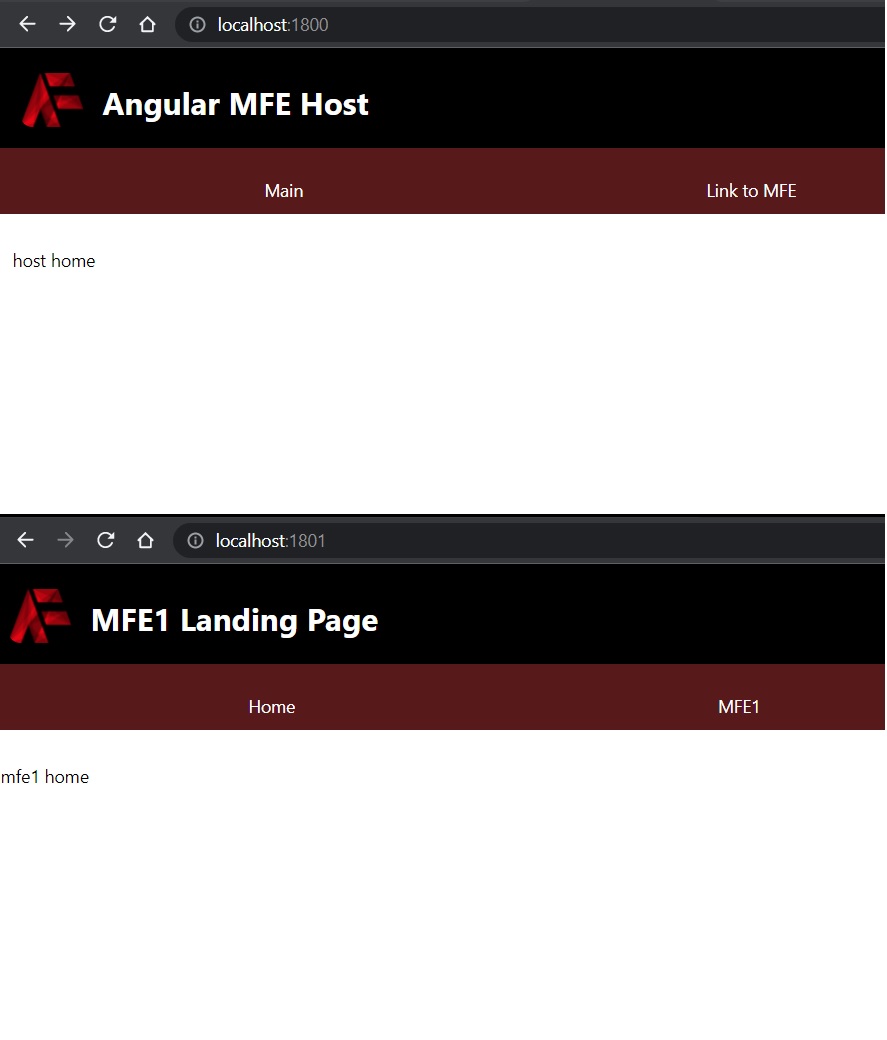
Now I know that my implementation is incorrect for Module Federation, in the sense that the host and other “children” micro front ends would not share the same styling because the “children” micro front ends would be contained within the host. For that reason it wouldn’t make sense to have a nav bar within a nav bar as is in this case, but for the sake of a POC we’ll let this one slide. Besides, it can still be the case that a CSS class is used in multiple micro front ends, so in that instance all we need to do is reference the stylesheet from within angular.json.

I took the liberty of uploading the codebase to a public repository on my GitHub account. That brings us to an end of another blog post. Thanks for reading.

Until next one,
Bjorn✌️

executing specific test files on cypress

Recently I was working on some Cypress tests, the first time I used them if I had to be honest, and I came across an issue. I wanted to run the test files individually but when I tried the solutions I found on the internet (StackOverflow and so on), no one of them worked for me. My setup was very bare, I didn’t even have a front end project as my tests involved sending requests to an API and asserting the HTTP responses, and the JSON values in the body. Being very new to Cypress I’m not sure if the following is the right way to go but I was executing the tests using command prompt and then reading the results using MochAwesome and an HTML file it produced. When researching online I read that there’s a some sort of a UI for running tests and reading results, but that was not my approach.

Instead I went for this approach. Inside the integration folder I created subfolders for each environment I wanted test. That is the reason why I had separate, individual files. Different environments have different credentials and environment variables. In the individual subfolders I had my JS test file. So roughly, my directory was like this

->root
  ->cypress
    ->integration
      ->development
        ->testfile.js
      ->staging
        ->testfile.js
      ->production
        ->testfile.js
  ->node_modules
  ->cypress.json
  ->package.json
  ->package-lock.json

Once I had that setup all I had to do was execute the following command on cmd.

npx cypress run --spec "cypress/integration/development/**"

Worth noting that if there had to be more than one JS test file inside a particular subfolder, say development, in that case all of the JS test files will be executed so yes I admit, technically speaking the title of this blog post isn’t accurate because this solution works for just one JS test file per subfolder, but hey who’s not guilty of implementing a not so clean solution?

Anyway, thanks for reading and I hope this is useful to some frustrated developer who can’t find a way to run cypress tests the way he/she wishes.

See you next post,
Bjorn

npm unable to authenticate

This week I tried to run a npm install command and update all the packages in a React appliction. The problem is that I haven’t touched this project in weeks if not months. During this time the npm credentials token seems to have expired and my npm intall failed and produced the following error.

Unable to authenticate, need: Bearer authorization_uri=https://login.windows.net/d950fde8-c220-47ba-953e-5912a9148c31, Basic realm="https://pkgsprodsu3weu.app.pkgs.visualstudio.com/"

What worked for me was running the following command

vsts-npm-auth -config .npmrc

Just in case you get this error,

'vsts-npm-auth' is not recognized as an internal or external command, operable program or batch file.

Then just run this package install command,

npm install -g vsts-npm-auth

Now that I had my credentials token update I was able to run npm install again without any issues.

UPDATE:
If the issue persists try running this

vsts-npm-auth -config .npmrc -r -f -v normal

Until next post,
Bjorn

implementing a cascading dropdown list with MVC and Jquery

By definition (my own) a cascading dropdown list(s) is a set of dropdown list(s) dependent on their parent dropdown list. In this blog post we’ll see how this can be achieved in ASP.NET’s MVC pattern, with the help of some client-side scripting too. For simplicity I will be using the standard template that Visual Studio creates for you when you create a new project. Also, I uploaded the source code to this GitHub location.

All right so let’s say that we’re going to have three dropdown lists, and through these we will be able to drill down from continent, to countries, to cities. All the data in this project is hard coded but it can easily be retrieved from a database or some other source. So first thing we’ll do is update the Index method in the HomeController to make it look like the following;


public ActionResult Index()
{
continents = new List();
continents.Add(new SelectListItem { Text = "Select continent", Value = "0" });
continents.Add(new SelectListItem { Text = "Europe", Value = "1" });
continents.Add(new SelectListItem { Text = "North America", Value = "2" });
continents.Add(new SelectListItem { Text = "South America", Value = "3" });
ViewData["continents"] = continents;
countries = new List();
countries.Add(new SelectListItem { Text = "Select country", Value = "0" });
ViewData["countries"] = countries;
cities = new List();
cities.Add(new SelectListItem { Text = "Select city", Value = "0" });
ViewData["cities"] = cities;
return View();
}

So we created three lists of type SelectListItem and filling them with some data, and then passing them to our view using the ViewData. These lists can also be bound to a model and then pass the model to the view. I chose the ViewData option for simplicity. Within the view we need to create three dropdown lists and make a reference to the ViewData.


<div class="row">
<div class="col-md-4">
@Html.DropDownList("continents", ViewData["continents"] as List)
</div>
<div class="col-md-4">
@Html.DropDownList("countries", ViewData["countries"] as List)
</div>
<div class="col-md-4">
@Html.DropDownList("cities", ViewData["cities"] as List)
</div>
</div>

Now we got three dropdown lists with some data in them. For the next part we need to add some client-side scripting so we can load more data dynamically. Using Jquery we will make an AJAX call and get data according to what the user selected.


$("#continents").change(function () {
$("#countries").empty();
$.ajax({
type: 'POST',
url: '/Home/GetCountries',
dataType: 'json',
data: { selectedValue: $("#continents").val() },
success: function (areas) {
$.each(areas, function (i, area) {
$("#countries").append('' + area.Text + '');
});
},
error: function (ex) {
alert('Failed to retrieve countries.' + ex);
}
});
return false;
});
$("#countries").change(function () {
$("#cities").empty();
$.ajax({
type: 'POST',
url: '/Home/GetCities',
dataType: 'json',
data: { selectedValue: $("#countries").val() },
success: function (cases) {
$.each(cases, function (i, ucase) {
$("#cities").append('' + ucase.Text + '');
});
},
error: function (ex) {
alert('Failed to retrieve cities.' + ex);
}
});
return false;
});

Back to the HomeController we are going to create two entry points and do our logic in there.


public JsonResult GetCountries(string selectedValue)
{
countries = new List();
countries.Add(new SelectListItem { Text = "Select country", Value = "0" });
switch (selectedValue)
{
case "1":
countries.Add(new SelectListItem { Text = "United Kingdom", Value = "1" });
countries.Add(new SelectListItem { Text = "Italy", Value = "2" });
countries.Add(new SelectListItem { Text = "Greece", Value = "3" });
break;
case "2":
// more countries
break;
case "3":
// more countries
break;
}
return Json(new SelectList(countries, "Value", "Text"));
}
public JsonResult GetCities(string selectedValue)
{
cities = new List();
cities.Add(new SelectListItem { Text = "Select city", Value = "0" });
switch (selectedValue)
{
case "1":
cities.Add(new SelectListItem { Text = "Glasgow", Value = "1" });
cities.Add(new SelectListItem { Text = "London", Value = "2" });
cities.Add(new SelectListItem { Text = "Edinburgh", Value = "3" });
break;
case "2":
// more cities
break;
case "3":
// more cities
break;
case "4":
// more cities
break;
case "5":
// more cities
break;
// more cases
}
return Json(new SelectList(cities, "Value", "Text"));
}

And that should be it. Feel free to share your thoughts if you have any suggestions. Until the next post.

Bjorn

improving a website’s performance – part 2

A while back (i.e. more than a year ago! yeah I kept myself busy) I wrote the first part of this post, improving a website’s performance – part 1. A few tricks and tips which I’ve learnt over the years which improve a website’s performance, and in return giving the end user a better web experience. A better web experience increases and attracts traffic, and if your website generates money then that translates to profit *cha-ching*.

In the first part of this article the focus was on minification of resources, minimising HTTP requests and optimisation of images. In this post we will be looking at implementation of caching, server side improvements and useful performance tools.

Implement Caching

Latest web browsers can, and probably will, cache a website’s external files, such as CSS, JS and images. As a developer, enabling HTTP caching, will allow these files to be stored on the user’s machine after they are initially downloaded when the user visits the website for the first time. Once stored they will be used again whenever the user re-visits the website instead of re-downloading again. This is quite effective because it will improve the loading and response of the website. Think about it from this point of view, every time you’re hitting that “Back” button most of the data that is already downloaded will be fetched from the storage of your machine instead of getting packets of data from the web. One needs to be careful not to overload this feature though. Any content that features data or information that can change often must not be cached or else the user might end up reading expired information. This can be avoided by having shorter HTTP caching expiry dates to force the web browser to fetch the latest information. A good trick to make sure that the web browser is requesting the latest files from the server and not from the user’s storage is to change the file name.

Server Side Improvements

Improving a website’s performance does not necessarily mean tweaking some stuff from client side but also optimising processes from server side. Do review your code and don’t be afraid to make changes to your source code if a bottle neck is found. These optimisations will reflect on the website’s response and page load times. Tighten loops when possible by moving unnecessary logic. If a loop, that has a lot of iterations, has achieved the result after just a few iterations, then exit that loop and move on to the next process. Again, say a database connection, or even authentication calls, are being declared and populated inside the loop, then, do yourself a favour and make database calls outside of the loop to minimise the amount of calls being done. Other ways to write efficient code is to declare variable types if the data type is known. Avoid any unnecessary variable conversions and once the processing is complete set the variables which aren’t going to be used again to null, particularly if the variables’ type are of complex types and hold large amounts of data. Lastly, before writing the code, analyse the flows and consider implementing appropriate design. You would be surprised what a difference it makes in the long run to actually sit down and design the logic on a piece of paper before implementing it on your computer.

Performance Tools

To test the improvements or simply just to get an idea of the current rating of your website there are a few tools you can make use of. These tools analyse websites and grade features which are related to the website’s performance such as, minification of resources, the amount of HTTP request and image sizes being loaded, in other words the implementations that we have been discussing above and in the previous blog post. On top of that they check the website’s response time from different geographical locations and different web browsers, some of them also checking for mobile responsiveness. There is quite a selection of different tools you can use, some of them are online tools which test and produce their results via their website whereas others have to be downloaded and installed on your computer or web browser. Some of the most popular are Pingdom, KeyCDN, Website Speed Test and GTmetrix, the last two being completely free to use. Worth mentioning is that GTmetrix makes use of Yahoo’s YSlow and Google’s PageSpeed, two reliable tools that perform the same job however GTmetrix takes both results, compares them and produces the final rating.

Developing a website which looks nice and attractive is quite important if you would like to have a constant figure of visitors, because at the end of the day design is considered as a huge factor in web development. However, having said that, it is important to give the visitor a website that has a quick response time and an overall better user experience. When developing a website, it is important to keep in mind that the website should be running smoothly and implementing the features we have discussed would surely help to achieve this result.